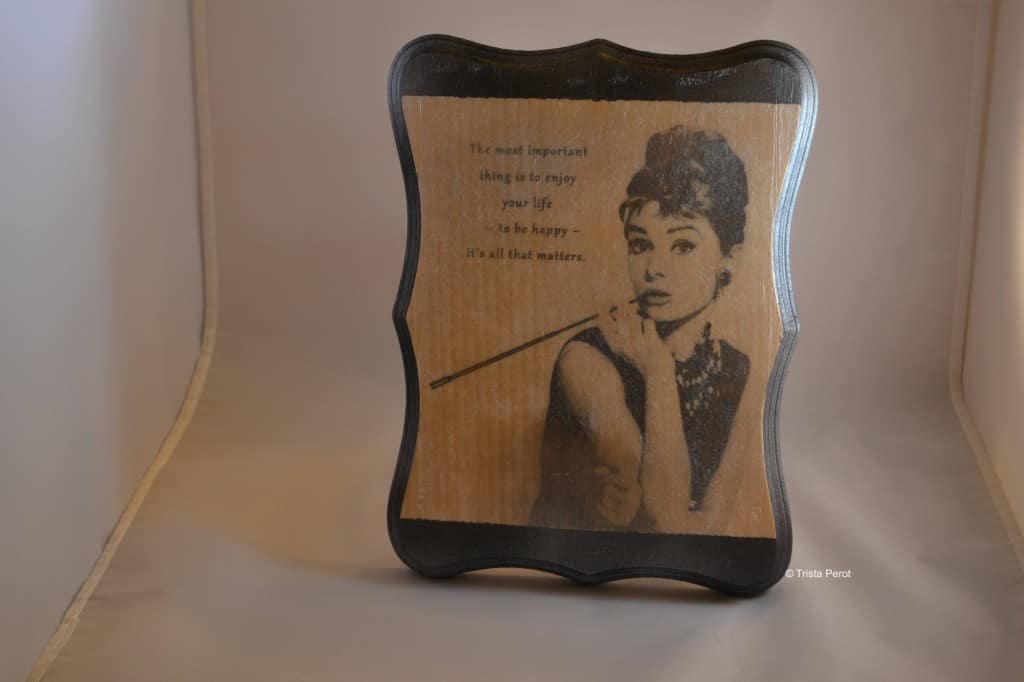
Today I am featuring one of my dear blogger friends, Sevi Ware of Ware is the Vodka. She has been a founding member of our Craft Exchange since it’s inception and I couldn’t imagine it without her! I love how she always goes head first into each project and for our 7th exchange with the Breakfast at Tiffany’s theme, she made these super fun wood plaques using gel medium and images from the movie. As you’ll read below, she’s not a fan of the stuff (I am though :)), but I think they were totally worth the effort! In her words, here’s how to make her project and the inspiration behind it.

What inspired you to pick this project?
David and I have been looking at different ways to decorate our house and these came across our radar.
What materials did you use?
Wood Blocks, Liquitex Gel Medium, Printed Photos, Mod Podge Pearlized Spray, Black Acrylic Paint
Where did you get your materials?
Most of the items I already had in my craft closet – Wood Blocks and Liquitex were from Hobby Lobby
Cost of materials:
$40 (This was to make several items)
How did you make it?
In order to get the quote to work on the image I chose, I had to flip the text and place it in a location that would be on the wood blocks. Once that was completed and with my husband’s assistance, we laid out the wood blocks and slathered each of them with liquitex. We put liquitex on the front side of the pages before laying them down on top of the blocks – then allowed each of the products to dry overnight. The next evening we used water to dampen the paper that “should’ve” peeled off with some elbow grease. We had to put a little more work into getting the paper off that took us a good two days. After most of the paper was removed, I painted the edge of the board with black acrylic paint and allowed to dry. Once the black edges were completed, I sealed them with Mod Podge pearlized spray.
How long did it take per item?
It would literally take a two-three days to complete these. I did them all at once, so the process was a good three days!
What was the hardest part about making this?
The hardest part was hands down removing the paper from the wood blocks. I honestly don’t think we got all of it off. The videos and DIY blogs definitely made this project seem much easier than I thought it was. Thank goodness my husband was around to keep me sane!
What was the funnest part about making this?
Definitely the concept of what I wanted to see as the end result. The idea of what I originally envisioned got me really excited.
Do you like it?
I like it, but I don’t love it. I’ve definitely enjoyed other projects more than this one. I may jump behind my sewing machine for the next one!
If you made it again, what would you change?
I would probably use a different gel medium. I feel like the type I used just didn’t work as well as I would’ve liked.
Would you make it again and why?
No, it was too much of a hassle and I am a perfectionist. I settled with this project after watching a ton of videos and reading about the best ways to go about it. Of course reading and doing are two different things.
Thanks Sevi – I know you weren’t thrilled but I love them!

 What’s your happy place? Crafting? Cooking? Cocktails? Party planning? Yes please! I love it all, and I’ve tried a lot. Check out my how-to’s! What should we do next?


I had my daughter’s 3/4 grade class do this project. I used a picture of the life guard tower by our school. It turned out beautiful. But I was glad I had 20 x 2 little hands helping rub off the paper! the piece of wood I used was scrap from the floor of an old bowling alley.
LOL! I can only imagine! I have used this on glass, but never wood. I’d like to try it.