
I chose this project for our second craft exchange, and let me tell you I’m glad I had the full four months to crank out 18 of these!
Seriously, you need a lot of wine bottles if you are going to make wine bottle glasses. If you decide to upcycle wine bottles to make glasses, start collecting early. I am lucky that my cousin works for Vino Volo and I could get their throw-away wine bottles. If you’re thinking of making wine bottle glasses, check with a local bar or restaurant and see if they’ll save their empties for you, you’ll be glad you did.
I was initially intrigued by a post on my friend Jaderbomb’s blog on how to cut glass with a string. Here’s my Vine version in six seconds:
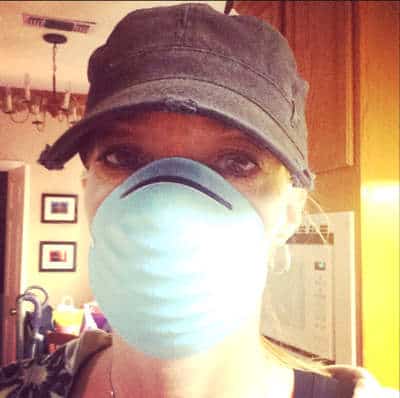
Jaderbomb must have special glass cutting superpowers because even though I could get this to work – IN THEORY — I had a hard time getting it to cut even. And then there’s the whole fire thing… good golly. I’m not brave enough for that and my husband was not on board. Plus my daughter wanted to help me from the 30 feet away that I made her stand, and that terrified me. We both put on gloves and masks but I was 100% sure that the kitchen was a horrible place to burn acetone and that we’d all die of chemical poisoning. Five – seven bottles later, I scrapped the fire method and went online in search of a better way.
It took me a few weeks to get the courage up to continue with this project but after reading lengthy reviews, I finally bought this Ephram’s bottle cutter kit.
I was back on track.
While I was waiting for the bottle cutter to ship, I was busy soaking labels off.
Step One: Remove Labels
Let me tell you, this is my most hated, tedious, part of this project. I found that soaking the wine bottles in hot water with dish detergent (not a lot, but a enough for a few bubbles) worked best. I filled the wine bottles with hot water too to make them sink to the bottom of the sink and I could fit about 7 wine bottles in the sink at a time. After about 20 minutes, the labels were ready to scrape off (some – not enough – labels were floating on top of the water). Many still left an adhesive even after scraping and scraping and scraping. It didn’t help any that I was trying to save some of the labels for another project. I probably should have removed the remaining adhesive with Goo Be Gone at this point, but I waited until after cutting the wine bottles to do it.
After the bottles are dry (and I didn’t do this all at one time, trust me. We had a death in the family, I was gone for weeks, really, this was a drawn out process…), you can cut them. And that’s the exciting part.
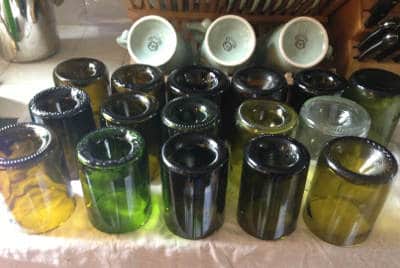
Step Two: Cut Wine Bottles
Etch the bottle all the way around. This cutter has a cradle to lay the bottle on so your line stays steady and that helps keep the lip of your glass even.
The bottle cutting people will tell you to use a candle on the etched area, followed by an ice cube, and the change in temperature will cause the bottle to break. I tried that on one wine bottle for about 3 minutes and scrapped it. Clearly they don’t know how incredibly impatient I am. I fast tracked it by using a pot of boiling water and a huge metal bowl full of ice water – with lots of ice cubes. As they melted, I added more.
I held the bottle in the pot of boiling water for anywhere between 7 and 20 seconds depending on how thick the bottle was. Then I immediately dunked it into the ice water bath.
Most times it would crack immediately. Sometimes in half so the bottom was floating in the bowl, sometimes not but I could hear the crack happen so I knew it was done and then it was easy to pull the two pieces apart. That’s IF it went as planned. There were plenty of wine bottles that didn’t crack evenly, or at all. For the ones that didn’t crack, I did the hot water/cold water routine again on them.
I’d say that about 30+ percent of the wine bottles were usable. Perhaps if you did the candle/ice cube method you’d have a higher return, but again, that would be like watching paint dry for me. I’d rather break extra wine bottles than spend that long on each one.
Step Three:
Once the pieces are dry, or several weeks later in my case, you have to file down the edges. Some are sharp so you definitely want to make sure you don’t forget this step! The instructions with the kit said to use this wet/dry Emory cloth, and to grind the edges on a spare piece of glass (go buy one for $2 at Home Depot) with this Emory powder. Well, let me tell you that grinding method was just as tedious as the candle/ice cube idea. I gave it the good old college try for about 5 ear piercing minutes of elbow grease of glass on glass. No thanks. The sandpaper thing that came with the kit worked great, but with all those glasses it was about used up. The guys at Home Depot recommended a sand paper used for a dremmel saw so I tried that too. Seemed to work just as well.
Step Four:
Be sure to wash the glasses as this point. Get all the glass powder and Goo Be Gone off of them.
Finally for the fun part! Painting or etching the wine bottle glasses! Of course you COULD leave them the way they are, but I wanted a little pizzazz. Okay, glitter. I love glitter.
Because I am a lover of all products from Martha Stewart, I was thrilled to have an excuse to buy Martha Stewart glass paint, stencils and glass etching cream, and that’s exactly what I did.
Step Five:
Be sure to clean the wine bottle glasses again, this time with alcohol, to ensure there’s no left-over residue on them.
I first tried the etching cream on a spare piece of wine bottle but I couldn’t get it to etch like I wanted it to in the 5 or 10 minutes that I left it on, so I abandoned it. Can you tell I am an instant gratification kinda girl? It’s a curse. I will definitely go back to this method though because I feel like it would last longer than paint would.
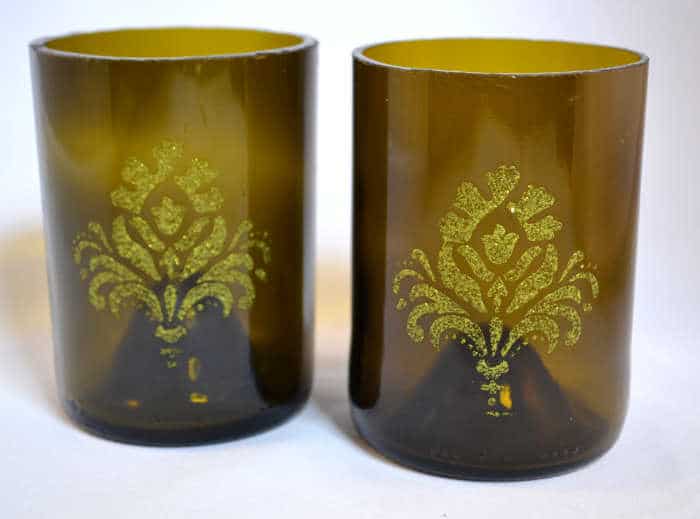
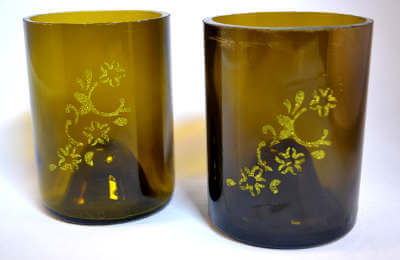
Truth be known, I really, really wanted to use the glitter paint on the wine bottle glasses. I grabbed my Martha Stewart daubers that she gave me when I was on her show, and Martha Stewart Fine Glitter Glass Paint in Golden Beryl for the green wine bottles and Sterling for the chardonnay glasses. In retrospect I would have liked the chardonnay bottles better with a gold color, but…. I wasn’t going back to the store.
The stencils are Martha Stewart adhesive stencils, and they were fantastic. Simply place the stencil on the wine bottle glasses where you want the image, then apply paint to your dauber and dab on the open areas of the stencil. Peel off the stencil and admire how awesome you are. If you don’t like it, just wipe it off and start again!
I thought they might lose some sticky after using them a couple times, but they didn’t. I washed them off when I was done and they were still sticky so I carefully put them away to use again.
If – okay when, I do this again, I will make a thicker layer of glitter paint on the glasses. I liked the look of these but its so much more glittery with a thicker application. I know this because I drew a thick line of paint on a piece of glass to test how long it would take to dry.
Step Six:
What, you thought we were done? NO! You have to set the paint on the wine bottle glasses. The instructions for the Martha Stewart glass paint say that you can do one of two things to set the paint: air cure or oven cure.
After all I went through on these so far, I was not about to lose any wine bottle glasses to a mishap in the oven. My fear was that some might crack in the heat, even though it was a low heat, and I’d have to start over. Therefore I went the safe route and air cured for 21 days.
And promptly left for vacation.
I love love love how these turned out! I kept one for me that I made from a giant wine bottle and two others to hold craft supplies in. I want to make another one from a beer bottle for make-up brushes. You’d think I’d be over this whole project after having spent so much time on it, but I actually can’t wait to do more!

 What’s your happy place? Crafting? Cooking? Cocktails? Party planning? Yes please! I love it all, and I’ve tried a lot. Check out my how-to’s! What should we do next?


I see you share interesting things here, you can earn some extra money, your blog has
big potential, for the monetizing method, just search in google – K2 advices how to monetize a website
I love those glasses! I am so glad you confirmed the best process. I am going to have to make some. As a “professional” wine drinker 🙂 you can remove wine labels by baking them in oven for 10 minutes at 300 degrees. Some folks who drink fancy wine (not me) then save their labels for their wine review books.
Oh my goodness! You would have saved me SOOOOO much time! LOL. I’m trying this method tonight. You’d think as a fellow “professional” wine drinker I would have known this… THANK YOU!